 Image by Red Hat on Getting started with OpenShift Virtualization
Every since I blew away my OVirt installation to form a OKD/OpenShift cluster, I had not been able to stand up any virtual machines. After getting through some other things on my checklist (Backups, pipelines), I finally got around and setup proper virtual machine on OpenShift using KubeVirt aka OpenShift Virtualization. This gave me a chance to refresh what I learned from the DO316 training course, particularly when comes to opening access to virtual machines. There are some common similarities, as well as some wrinkles.
So what I would like to do is to go through the launch of virtual machines and then demo on how access is setup for them them. It is not a deep dive there are better resources for that, but it should give you a good idea of how opertionally it works.
Requirements
Besides the usual disclaimers, we are going to assume that you have these operators already running:
Fortunately those operators are easy to install with no changes to defaults.
You will also need some virtualization background and linux ba
The Basics
To starts us off, let create a Linux virtual machine using Rocky Linux. First, we create a data volume.
apiVersion: cdi.kubevirt.io/v1beta1
kind: DataVolume
metadata:
  name: rocky-dv-sr
  namespace: virtual-machine-compute
spec:
  source:
    http:
      url: "https://dl.rockylinux.org/pub/rocky/10/images/x86_64/Rocky-10-GenericCloud-Base.latest.x86_64.qcow2"
  pvc:
    accessModes:
      - ReadWriteMany
    resources:
      requests:
        storage: 20Gi
    storageClassName: nfs-csi
A data volume is a special PVC that allows imports of virtual images for use to create virtual machines. Technically, you don't need it, but if you are using virtual machines, chances are that you are doing so with data that must be stateful. Knowing that, you would need storage.
With this manifest, we import a Rocky Linux 10 Qemu image into the volume during the import, we create a PVC and request 20 gigs from nfs-csi storage class. Note that we also specified the acess mode of ReadWriteMany - we do this becaused we need to able to live migrate our VM to another host (for VMotion for you VMWare engineers).
With the storage defined, we now spin up our virtual machine with this manifest:
apiVersion: kubevirt.io/v1
kind: VirtualMachine
metadata:
  name: rocky-vm-sr
  namespace: virtual-machine-compute
spec:
  runStrategy: RerunOnFailure
  template:
    metadata:
      labels:
        kubevirt.io/domain: rocky-vm-sr
        app: webserver
    spec:
      evictionStrategy: LiveMigrate
      accessCredentials:
        - sshPublicKey:
            propagationMethod:
              noCloud: {}
            source:
              secret:
                secretName: sammy-chocolate-bird-34
      domain:
        cpu:
          cores: 1
          sockets: 1
          threads: 1
        memory:
          guest: 4Gi
        devices:
          disks:
            - disk:
                bus: virtio
              name: rootdisk
            - disk:
                bus: virtio
              name: cloudinitdisk
          interfaces:
            - masquerade: {}
              model: virtio
              name: default
      networks:
        - name: default
          pod: {}
      volumes:
        - name: rootdisk
          dataVolume:
            name: rocky-dv-sr
        - cloudInitNoCloud:
            userData: |-
              #cloud-config
              user: cloud-user
              chpasswd: { expire: False }
              packages:
                - httpd
              runcmd:
                - "sudo systemctl enable httpd --now"
                - "echo '<html><body><h1>Rocky Linux Web Server on KubeVirt!</h1></body></html>' | sudo tee /var/www/html/index.html"
          name: cloudinitdisk
Lets focus on the most important parts. First, we set our labels:
    metadata:
      labels:
        kubevirt.io/domain: rocky-vm-sr
        app: webserver
This is what we will need to route our traffic. That is shouldn't be surprising if you are familar with kubernetes. The next one may not be if you never worked with virtual machines as we starting into .template.spec:
    spec:
      evictionStrategy: LiveMigrate
      accessCredentials:
        - sshPublicKey:
            propagationMethod:
              noCloud: {}
            source:
              secret:
                secretName: sammy-chocolate-bird-34
The evictionStrategy tell us to migrate our virtual machines to another hosts if the virtual machine needs to be evicted from the node. This is distinct from the usual strategy of just recreating the POD in another host. Alternatively, you can have the virtual machine shutdown, but if you intend to keep the app on the virtual machine running, you would want this.
(As an aside, when you spin up an virtual machine, there is a corresponding pod that manage it, so that component gets recreated when the node starts to evicts its resources)
The accessCredentials adds a public key from a secrets into the virtual machine. This lets you connect to your virtual machine via ssh.
The next section defines the hardware.
      domain:
        cpu:
          cores: 1
          sockets: 1
          threads: 1
        memory:
          guest: 4Gi
        devices:
          disks:
            - disk:
                bus: virtio
              name: rootdisk
            - disk:
                bus: virtio
              name: cloudinitdisk
          interfaces:
            - masquerade: {}
              model: virtio
              name: default
Here, we are allocating a single cpu, and two disks - one for the boot or rootdisk, the other to for storing our run time configuration for cloud init (this is where you run your initial configuration), then a network interface connected to the default network.
The default network in question is the pod network, which we will attach with:
     networks:
        - name: default
          pod: {}
Finally, we attach the volume:
      volumes:
        - name: rootdisk
          dataVolume:
            name: rocky-dv-sr
        - cloudInitNoCloud:
            userData: |-
              #cloud-config
              user: cloud-user
              chpasswd: { expire: False }
              packages:
                - httpd
              runcmd:
                - "sudo systemctl enable httpd --now"
                - "echo '<html><body><h1>Rocky Linux Web Server on KubeVirt!</h1></body></html>' | sudo tee /var/www/html/index.html"
          name: cloudinitdisk
The first volume is the datavolume that contains our boot disk we created. The second volume is where we have initial setup, including user creation, package to install (in this case, apache httpd) and commands to start up httpd and create an index page.
Now we created our manifest, we got the mininum to stand up our virtual machines. At this point, we just need to define our services and routes:
---
apiVersion: v1
kind: Service
metadata:
  name: rocky-linux-webserver
  namespace: virtual-machine-compute
  labels:
    app: webserver
spec:
  selector:
    app: webserver
  ports:
    - protocol: TCP
      port: 80
      targetPort: 80
  type: ClusterIP
---
kind: Route
apiVersion: route.openshift.io/v1
metadata:
  name: rocky-linux-webserver-route
  namespace: virtual-machine-compute
spec:
  host: route-rocky-linux-webserver-virtual-machine-compute.apps.okd.example.com
  to:
    kind: Service
    name: rocky-linux-webserver
    weight: 100
  port:
    targetPort: 80
  tls:
    termination: edge
    insecureEdgeTerminationPolicy: Redirect
  wildcardPolicy: None
Putting it all together, our code looks like this:
---
apiVersion: cdi.kubevirt.io/v1beta1
kind: DataVolume
metadata:
  name: rocky-dv-sr
  namespace: virtual-machine-compute
spec:
  source:
    http:
      url: "https://dl.rockylinux.org/pub/rocky/10/images/x86_64/Rocky-10-GenericCloud-Base.latest.x86_64.qcow2"
  pvc:
    accessModes:
      - ReadWriteMany
    resources:
      requests:
        storage: 20Gi
    storageClassName: nfs-csi

---
apiVersion: kubevirt.io/v1
kind: VirtualMachine
metadata:
  name: rocky-vm-sr
  namespace: virtual-machine-compute
spec:
  runStrategy: RerunOnFailure
  template:
    metadata:
      labels:
        kubevirt.io/domain: rocky-vm-sr
        app: webserver
    spec:
      evictionStrategy: LiveMigrate
      accessCredentials:
        - sshPublicKey:
            propagationMethod:
              noCloud: {}
            source:
              secret:
                secretName: sammy-chocolate-bird-34
      domain:
        cpu:
          cores: 1
          sockets: 1
          threads: 1
        memory:
          guest: 4Gi
        devices:
          disks:
            - disk:
                bus: virtio
              name: rootdisk
            - disk:
                bus: virtio
              name: cloudinitdisk
          interfaces:
            - masquerade: {}
              model: virtio
              name: default
      networks:
        - name: default
          pod: {}
      volumes:
        - name: rootdisk
          dataVolume:
            name: rocky-dv-sr
        - cloudInitNoCloud:
            userData: |-
              #cloud-config
              user: cloud-user
              chpasswd: { expire: False }
              packages:
                - httpd
              runcmd:
                - "sudo systemctl enable httpd --now"
                - "echo '<html><body><h1>Rocky Linux Web Server on KubeVirt!</h1></body></html>' | sudo tee /var/www/html/index.html"
          name: cloudinitdisk
---
apiVersion: v1
kind: Service
metadata:
  name: rocky-linux-webserver
  namespace: virtual-machine-compute
  labels:
    app: webserver
spec:
  selector:
    app: webserver
  ports:
    - protocol: TCP
      port: 80
      targetPort: 80
  type: ClusterIP
---
kind: Route
apiVersion: route.openshift.io/v1
metadata:
  name: rocky-linux-webserver-route
  namespace: virtual-machine-compute
spec:
  host: route-rocky-linux-webserver-virtual-machine-compute.apps.okd.example.com
  to:
    kind: Service
    name: rocky-linux-webserver
    weight: 100
  port:
    targetPort: 80
  tls:
    termination: edge
    insecureEdgeTerminationPolicy: Redirect
  wildcardPolicy: None
We apply it:
➜  vms git:(main) oc create -f rockylinux-sr.yaml
datavolume.cdi.kubevirt.io/rocky-dv-sr created
virtualmachine.kubevirt.io/rocky-vm-sr created
service/rocky-linux-webserver created
route.route.openshift.io/rocky-linux-webserver-route created
And it is running:
➜  vms git:(main) oc get service
NAME                    TYPE        CLUSTER-IP       EXTERNAL-IP   PORT(S)    AGE
headless                ClusterIP   None             <none>        5434/TCP   6d8h
rocky-linux-webserver   ClusterIP   172.30.134.243   <none>        80/TCP     2m
➜  vms git:(main) oc get svc
NAME                    TYPE        CLUSTER-IP       EXTERNAL-IP   PORT(S)    AGE
headless                ClusterIP   None             <none>        5434/TCP   6d8h
rocky-linux-webserver   ClusterIP   172.30.134.243   <none>        80/TCP     2m3s
And we can view the web site:

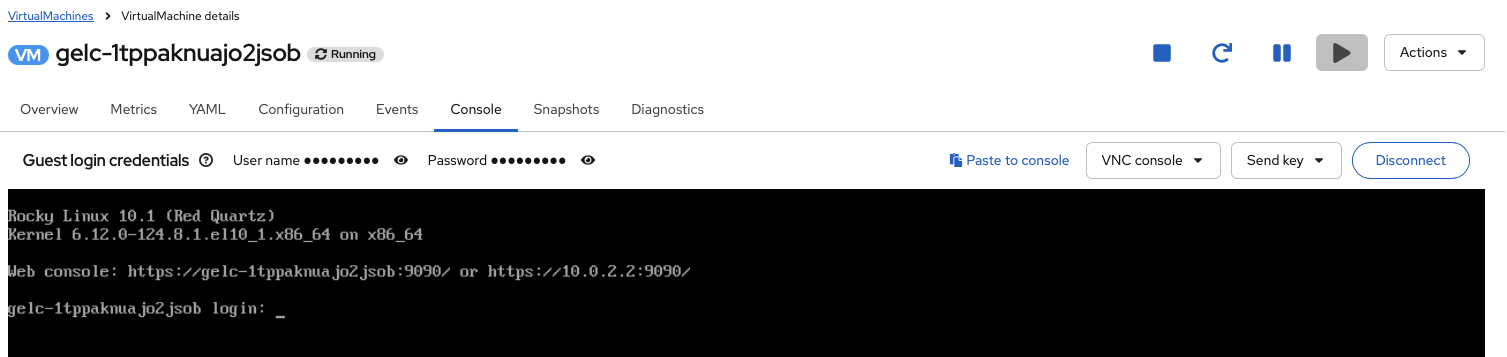
For remote access, if you defined a password for your remote user, you can access the console via the OpenShift Virtualization UI using the VNC or serial console. Here is the example:
If you prefer, you can connect in the terminal as well via using VNC, serial, or ssh using virtctl (which you can download from the OpenShift Virtualition Overview):

Or upstream. This is what it looks like if you connect via ssh through virtctl:
➜  ~ virtctl ssh -l  cloud-user vm/rocky-vm-sr  --identity-file=$HOME/.ssh/id_ecdsa_okd
The authenticity of host 'vm.rocky-vm-sr.virtual-machine-compute (<no hostip for proxy command>)' can't be established.
ED25519 key fingerprint is SHA256:JExx+ltZDBTQsA+zjaLrvp+vsN1A9OXYskARrdZZJBc.
This key is not known by any other names.
Are you sure you want to continue connecting (yes/no/[fingerprint])? yes
Warning: Permanently added 'vm.rocky-vm-sr.virtual-machine-compute' (ED25519) to the list of known hosts.
[cloud-user@rocky-vm-sr ~]$ cat /etc/redhat-release
Rocky Linux release 10.1 (Red Quartz)
[cloud-user@rocky-vm-sr ~]$
What if, though, you wanted to connect directly via ssh? For that matter, what if you can't use route for your site on your virtual machine or you need to expose a non-http port?
Using MetalLB With KubeVirt / OpenShift Virtualization
For some environments, particularly on-premises environment, MetalLB is what you would in place of route. It allows you to attach an external IP to your service and use that as your load balancer / outside traffic end point. We will use to define an IP for us to connect via ssh directly:
Since we already have our MetalLB installed, we first define our MetalLB instance in the metallb-system namespace:
apiVersion: metallb.io/v1beta1
kind: MetalLB
metadata:
  name: metallb
  namespace: metallb-system
➜  ~ oc get metallbs.metallb.io -n metallb-system
NAME      AGE
metallb   9d
Then we define our IP Pool (which should be a list of IPs you reserved in your network) in the metallb-system namespace
apiVersion: metallb.io/v1beta1
kind: IPAddressPool
metadata:
  name: ip-addresspool-sample1
  namespace: metallb-system
spec:
  addresses:
    - 172.16.3.40-172.16.3.80
  autoAssign: true
  avoidBuggyIPs: false
➜  ~ oc get ipaddresspools.metallb.io -n metallb-system
NAME                     AUTO ASSIGN   AVOID BUGGY IPS   ADDRESSES
ip-addresspool-sample1   true          false             ["172.16.3.40-172.16.3.80"]
And finally, we define our layer 2 advertisment in the metallb-system namespace (referencing our previously created address pool):
apiVersion: metallb.io/v1beta1
kind: L2Advertisement
metadata:
  name: l2-adv-sample1
  namespace: metallb-system
spec:
  ipAddressPools:
    - ip-addresspool-sample1
➜  ~ oc get l2advertisements.metallb.io -n metallb-system
NAME             IPADDRESSPOOLS               IPADDRESSPOOL SELECTORS   INTERFACES
l2-adv-sample1   ["ip-addresspool-sample1"]
With that done, we will clone the code and use it to launch new Rocky Linux virtual machine. It is a same code except it will have either -lb on the names and labels. And most importantly, we will define a service that will uset the allocated IP from MetalB:
---
apiVersion: v1
kind: Service
metadata:
  creationTimestamp: null
  labels:
    app: webserver-lb
    kubevirt.io/domain: rocky-vm-lb
    vm.kubevirt.io/name: rocky-vm-lb
  name: rocky-vm-lb
spec:
  ports:
  - port: 22
    protocol: TCP
    targetPort: 22
  selector:
    kubevirt.io/domain: rocky-vm-lb
  type: LoadBalancer
The service here will expose the ssh port 22 and we will define the service as type LoadBalancer. The LoadBalancer is what will invoke MetalLB to allocate the IP.
At this point, our code looks like this:
---
apiVersion: cdi.kubevirt.io/v1beta1
kind: DataVolume
metadata:
  name: rocky-dv-lb
  namespace: virtual-machine-compute
spec:
  source:
    http:
      url: "https://dl.rockylinux.org/pub/rocky/10/images/x86_64/Rocky-10-GenericCloud-Base.latest.x86_64.qcow2"
  pvc:
    accessModes:
      - ReadWriteMany
    resources:
      requests:
        storage: 20Gi
    storageClassName: nfs-csi

---
apiVersion: kubevirt.io/v1
kind: VirtualMachine
metadata:
  name: rocky-vm-lb
  namespace: virtual-machine-compute
spec:
  runStrategy: RerunOnFailure
  template:
    metadata:
      labels:
        kubevirt.io/domain: rocky-vm-lb
        app: webserver-lb
    spec:
      evictionStrategy: LiveMigrate
      accessCredentials:
        - sshPublicKey:
            propagationMethod:
              noCloud: {}
            source:
              secret:
                secretName: sammy-chocolate-bird-34
      domain:
        cpu:
          cores: 1
          sockets: 1
          threads: 1
        memory:
          guest: 4Gi
        devices:
          disks:
            - disk:
                bus: virtio
              name: rootdisk
            - disk:
                bus: virtio
              name: cloudinitdisk
          interfaces:
            - masquerade: {}
              model: virtio
              name: default
      networks:
        - name: default
          pod: {}
      volumes:
        - name: rootdisk
          dataVolume:
            name: rocky-dv-lb
        - cloudInitNoCloud:
            userData: |-
              #cloud-config
              user: cloud-user
              chpasswd: { expire: False }
              packages:
                - httpd
              runcmd:
                - "sudo systemctl enable httpd --now"
                - "echo '<html><body><h1>Rocky Linux Web Server on KubeVirt Also!</h1></body></html>' | sudo tee /var/www/html/index.html"
          name: cloudinitdisk
---
apiVersion: v1
kind: Service
metadata:
  name: rocky-linux-webserver-lb
  namespace: virtual-machine-compute
  labels:
    app: webserver-lb
spec:
  selector:
    app: webserver-lb
  ports:
    - protocol: TCP
      port: 80
      targetPort: 80
  type: ClusterIP
---
kind: Route
apiVersion: route.openshift.io/v1
metadata:
  name: rocky-linux-webserver-route-lb
  namespace: virtual-machine-compute
spec:
  host: route-rocky-linux-webserver-lb-virtual-machine-compute.apps.okd.example.com
  to:
    kind: Service
    name: rocky-linux-webserver-lb
    weight: 100
  port:
    targetPort: 80
  tls:
    termination: edge
    insecureEdgeTerminationPolicy: Redirect
  wildcardPolicy: None
---
apiVersion: v1
kind: Service
metadata:
  creationTimestamp: null
  labels:
    app: webserver-lb
    kubevirt.io/domain: rocky-vm-lb
    vm.kubevirt.io/name: rocky-vm-lb
  name: rocky-vm-lb
spec:
  ports:
  - port: 22
    protocol: TCP
    targetPort: 22
  selector:
    kubevirt.io/domain: rocky-vm-lb
  type: LoadBalancer
We apply it:
➜  vms git:(main) oc create -f rockylinux-mlb.yaml
datavolume.cdi.kubevirt.io/rocky-dv-lb created
virtualmachine.kubevirt.io/rocky-vm-lb created
service/rocky-linux-webserver-lb created
route.route.openshift.io/rocky-linux-webserver-route-lb created
service/rocky-vm-lb created
When we query the services and route, we notice that there is service with type LoadBalancer and there is an external IP with it:
➜  vms git:(main) oc get service,route
NAME                               TYPE           CLUSTER-IP       EXTERNAL-IP    PORT(S)        AGE
service/headless                   ClusterIP      None             <none>         5434/TCP       6d8h
service/rocky-linux-webserver      ClusterIP      172.30.134.243   <none>         80/TCP         5m23s
service/rocky-linux-webserver-lb   ClusterIP      172.30.246.125   <none>         80/TCP         2m27s
service/rocky-vm-lb                LoadBalancer   172.30.23.82     172.16.3.40   22:30505/TCP   2m27s

NAME                                                      HOST/PORT                                                                     PATH   SERVICES                   PORT   TERMINATION     WILDCARD
route.route.openshift.io/rocky-linux-webserver-route      route-rocky-linux-webserver-virtual-machine-compute.apps.okd.example.com             rocky-linux-webserver      80     edge/Redirect   None
route.route.openshift.io/rocky-linux-webserver-route-lb   route-rocky-linux-webserver-lb-virtual-machine-compute.apps.okd.example.com          rocky-linux-webserver-lb   80     edge/Redirect   None
And we can now connect to the virtual machine via that external IP:
➜  content git:(homelab-followup-notes-january) ✗ ssh cloud-user@172.16.3.40 -identity-file=$HOME/.ssh/id_ecdsa_okd
Warning: Identity file dentity-file=/Users/rilindo/.ssh/id_ecdsa_okd not accessible: No such file or directory.
The authenticity of host '172.16.3.40 (172.16.3.40)' can't be established.
ED25519 key fingerprint is SHA256:Fztnva3XlZBcmGwo1QbVHcKQVCwzwPhzn5kigO7cklU.
This key is not known by any other names.
Are you sure you want to continue connecting (yes/no/[fingerprint])? yes
Warning: Permanently added '172.16.3.40' (ED25519) to the list of known hosts.
[cloud-user@rocky-vm-lb ~]$ cat /etc/redhat-release
Rocky Linux release 10.1 (Red Quartz)
[cloud-user@rocky-vm-lb ~]$
And again, we can access the web site:

What if you prefer not to use a service, though? What if ou want to connect to the virtual machine directly?
Using NMState With KubeVirt / OpenShift Virtualization
NMState is orchestration for your network on your kubernetes / openshift clusters. It lets you configure your configuration with VLANs, bonds, bridges and other features you need to logically organize your network via Kubenetes code. We will now use to expose our VM directly to our external network.
NOTE: If you are using OKD, parts of the UI for NMState does not work, so use the cli for some steps.
First thing to do is to label the nodes we will use to connect to an external network. Now, I could use VLANs, but I have yet to configure my network to support that. But I have been replacing my Intel NUCs with BeeLinks and good news for me, they have a secondary interface. So on all the Beelink nodes, I connected the secondary interface and labeled them with external-network=true:
➜  ~ oc label node worker00.node.example.com external-network=true
➜  ~ oc label node worker01.node.example.com external-network=true
➜  ~ oc label node worker04.node.example.com external-network=true
➜  ~ oc get nodes
NAME                         STATUS   ROLES                  AGE     VERSION
control00.node.example.com   Ready    control-plane,master   110d    v1.33.5
control01.node.example.com   Ready    control-plane,master   110d    v1.33.5
control02.node.example.com   Ready    control-plane,master   110d    v1.33.5
worker00.node.example.com    Ready    worker                 24h     v1.33.5
worker01.node.example.com    Ready    worker                 7d23h   v1.33.5
worker02.node.example.com    Ready    worker                 109d    v1.33.5
worker03.node.example.com    Ready    worker                 71d     v1.33.5
worker04.node.example.com    Ready    worker                 63d     v1.33.5
➜  ~ oc get nodes -l external-network=true
NAME                        STATUS   ROLES    AGE     VERSION
worker00.node.example.com   Ready    worker   24h     v1.33.5
worker01.node.example.com   Ready    worker   7d23h   v1.33.5
worker04.node.example.com   Ready    worker   63d     v1.33.5
With that done, I create a NodeNetworkConfigurationPolicy called external-bridge (this is the UI part that does not work in the UI in OKD, so you will need to do it via the CLI)
apiVersion: nmstate.io/v1
kind: NodeNetworkConfigurationPolicy
metadata:
  name: external-bridge
spec:
  nodeSelector:
    external-network: "true"
  desiredState:
    interfaces:
      - name: br-external-net
        type: linux-bridge
        state: up
        mtu: 1500
        ipv4:
          enabled: true
          dhcp: true
        bridge:
          port:
            - name: enp2s0
          options:
            stp:
              enabled: false
This lets us create a linux bridge on interface enp2s0. Very importantly, I am targetting the policy with only the nodes with external-network labe, since those are the ones with that interface existing.
Once I applied, I should be able to see the policy created successfully:
➜  ~ oc get nncp
NAME              STATUS      REASON
external-bridge   Available   SuccessfullyConfigured
nmstate-sanity    Available   SuccessfullyConfigured
Now I will create a network attachment. That is what I will use to attach my virtual machines to the bridge:
apiVersion: k8s.cni.cncf.io/v1
kind: NetworkAttachmentDefinition
metadata:
  annotations:
    k8s.v1.cni.cncf.io/resourceName: bridge.network.kubevirt.io/br-external-net
  name: nad-efficient-grouse
  namespace: virtual-machine-compute
spec:
  config: |-
    {
        "cniVersion": "0.3.1",
        "name": "nad-efficient-grouse",
        "type": "bridge",
        "bridge": "br-external-net",
        "ipam": {},
        "macspoofchk": true,
        "preserveDefaultVlan": false
    }
(I originally create this via the UI and the UI generate random words for the names. I am keeping it as I find it whimsical)
When we apply it, we should see the NAD created on the nodes we targeted:
➜  ~ oc get nnce
NAME                                        STATUS      STATUS AGE   REASON
control00.node.example.com.nmstate-sanity   Available   42h          SuccessfullyConfigured
control01.node.example.com.nmstate-sanity   Available   42h          SuccessfullyConfigured
control02.node.example.com.nmstate-sanity   Available   42h          SuccessfullyConfigured
worker00.node.example.com.external-bridge   Available   24h          SuccessfullyConfigured
worker00.node.example.com.nmstate-sanity    Available   24h          SuccessfullyConfigured
worker01.node.example.com.external-bridge   Available   40h          SuccessfullyConfigured
worker01.node.example.com.nmstate-sanity    Available   42h          SuccessfullyConfigured
worker02.node.example.com.nmstate-sanity    Available   42h          SuccessfullyConfigured
worker03.node.example.com.nmstate-sanity    Available   42h          SuccessfullyConfigured
worker04.node.example.com.external-bridge   Available   40h          SuccessfullyConfigured
worker04.node.example.com.nmstate-sanity    Available   42h          SuccessfullyConfigured
➜  ~ oc get nnce -l nmstate.io/policy=external-bridge
NAME                                        STATUS      STATUS AGE   REASON
worker00.node.example.com.external-bridge   Available   24h          SuccessfullyConfigured
worker01.node.example.com.external-bridge   Available   40h          SuccessfullyConfigured
worker04.node.example.com.external-bridge   Available   40h          SuccessfullyConfigured
➜  ~
Now we are ready. We created new code and label as such with -name at the end, and make a few more changes to our VirtualMachine manifest:
---
apiVersion: cdi.kubevirt.io/v1beta1
kind: DataVolume
metadata:
  name: rocky-dv-nmstate
  namespace: virtual-machine-compute
spec:
  source:
    http:
      url: "https://dl.rockylinux.org/pub/rocky/10/images/x86_64/Rocky-10-GenericCloud-Base.latest.x86_64.qcow2"
  pvc:
    accessModes:
      - ReadWriteMany
    resources:
      requests:
        storage: 20Gi
    storageClassName: nfs-csi

---
apiVersion: kubevirt.io/v1
kind: VirtualMachine
metadata:
  name: rocky-vm-nmstate
  namespace: virtual-machine-compute
spec:
  runStrategy: RerunOnFailure
  template:
    metadata:
      labels:
        kubevirt.io/domain: rocky-vm-nmstate
        app: webserver-nmstate
    spec:
      evictionStrategy: LiveMigrate
      accessCredentials:
        - sshPublicKey:
            propagationMethod:
              noCloud: {}
            source:
              secret:
                secretName: sammy-chocolate-bird-34
      domain:
        cpu:
          cores: 1
          sockets: 1
          threads: 1
        memory:
          guest: 4Gi
        devices:
          disks:
            - disk:
                bus: virtio
              name: rootdisk
            - disk:
                bus: virtio
              name: cloudinitdisk
          interfaces:
            - masquerade: {}
              model: virtio
              name: default
            - bridge: {}
              model: virtio
              name: nic-white-chimpanzee-56
              state: up
      networks:
        - name: default
          pod: {}
        - multus:
            networkName: nad-curved-seahorse
          name: nic-white-chimpanzee-56
      volumes:
        - name: rootdisk
          dataVolume:
            name: rocky-dv-nmstate
        - cloudInitNoCloud:
            networkData: |
              version: 2
              ethernets:
                enp1s0:
                  dhcp4: true
                  # Higher metric means lower priority for the pod network
                  dhcp4-overrides:
                    route-metric: 200
                enp2s0:
                  dhcp4: true
                  # Lower metric means this becomes the preferred default route
                  dhcp4-overrides:
                    route-metric: 50
                  # Explicit static route for your workstation network
                  routes:
                    - to: 172.16.1.0/24
                      via: 172.16.3.1
            userData: |-
              #cloud-config
              user: cloud-user
              chpasswd: { expire: False }
              packages:
                - httpd
              runcmd:
                - "sudo systemctl enable httpd --now"
                - "echo '<html><body><h1>Rocky Linux Web Server on KubeVirt here!</h1></body></html>' | sudo tee /var/www/html/index.html"
          name: cloudinitdisk
---
apiVersion: v1
kind: Service
metadata:
  name: rocky-linux-webserver-nmstate
  namespace: virtual-machine-compute
  labels:
    app: webserver-nmstate
spec:
  selector:
    app: webserver-nmstate
  ports:
    - protocol: TCP
      port: 80
      targetPort: 80
  type: ClusterIP
---
kind: Route
apiVersion: route.openshift.io/v1
metadata:
  name: rocky-linux-webserver-route-nmstate
  namespace: virtual-machine-compute
spec:
  host: route-rocky-linux-webserver-nmstate-virtual-machine-compute.apps.okd.example.com
  to:
    kind: Service
    name: rocky-linux-webserver-nmstate
    weight: 100
  port:
    targetPort: 80
  tls:
    termination: edge
    insecureEdgeTerminationPolicy: Redirect
  wildcardPolicy: None
The one major change (aside from the names), so that we create a bridge:
          interfaces:
            - masquerade: {}
              model: virtio
              name: default
            - bridge: {}
              model: virtio
              name: nic-white-chimpanzee-56
              state: up
We then attach the bridge to our NAD:
      networks:
        - name: default
          pod: {}
        - multus:
            networkName: nad-curved-seahorse
          name: nic-white-chimpanzee-56
The other major change is related to our networks. Because we have multiple /24 networks, I have make some routing changes within the VM so that return traffic can be routed to the correct path:
            networkData: |
              version: 2
              ethernets:
                enp1s0:
                  dhcp4: true
                  # Higher metric means lower priority for the pod network
                  dhcp4-overrides:
                    route-metric: 200
                enp2s0:
                  dhcp4: true
                  # Lower metric means this becomes the preferred default route
                  dhcp4-overrides:
                    route-metric: 50
                  # Explicit static route for your workstation network
                  routes:
                    - to: 172.16.1.0/24
                      via: 172.16.3.1
Note that this may not be necessary in your environment, but if you are unable to connect, be sure to run a packet sniffer on your VM and engage with a network engiener if necessary to trace the network traffic path.
At this point, we are done, so we create the virtual machine:
➜  vms git:(main) oc apply -f rockylinux-nmstate.yaml
datavolume.cdi.kubevirt.io/rocky-dv-nmstate created
virtualmachine.kubevirt.io/rocky-vm-nmstate created
service/rocky-linux-webserver-nmstate created
route.route.openshift.io/rocky-linux-webserver-route-nmstate created
From the the cli, it may not be obvious what is the IP attached to the virtual machine:
➜  vms git:(main) oc get service,route
NAME                                    TYPE           CLUSTER-IP       EXTERNAL-IP    PORT(S)        AGE
service/headless                        ClusterIP      None             <none>         5434/TCP       6d8h
service/rocky-linux-webserver           ClusterIP      172.30.134.243   <none>         80/TCP         7m51s
service/rocky-linux-webserver-lb        ClusterIP      172.30.246.125   <none>         80/TCP         4m55s
service/rocky-linux-webserver-nmstate   ClusterIP      172.30.196.222   <none>         80/TCP         40s
service/rocky-vm-lb                     LoadBalancer   172.30.23.82     172.16.3.40   22:30505/TCP   4m55s

NAME                                                           HOST/PORT                                                                          PATH   SERVICES                        PORT   TERMINATION     WILDCARD
route.route.openshift.io/rocky-linux-webserver-route           route-rocky-linux-webserver-virtual-machine-compute.apps.okd.example.com                  rocky-linux-webserver           80     edge/Redirect   None
route.route.openshift.io/rocky-linux-webserver-route-lb        route-rocky-linux-webserver-lb-virtual-machine-compute.apps.okd.example.com               rocky-linux-webserver-lb        80     edge/Redirect   None
route.route.openshift.io/rocky-linux-webserver-route-nmstate   route-rocky-linux-webserver-nmstate-virtual-machine-compute.apps.okd.example.com          rocky-linux-webserver-nmstate   80     edge/Redirect   None
So you will need to find that by parsing the output of oc get vmi rocky-vm-nmstate. For example, here is me parsing the output with yq:
➜  ~ oc get  vmi rocky-vm-nmstate -o yaml | yq .status.interfaces
- infoSource: domain, guest-agent
  interfaceName: enp1s0
  ipAddress: 10.130.0.181
  ipAddresses:
    - 10.130.0.181
    - fe80::c0:81ff:fe4c:2f03
  linkState: up
  mac: 02:c0:81:4c:2f:03
  name: default
  podInterfaceName: eth0
  queueCount: 1
- infoSource: domain, guest-agent, multus-status
  interfaceName: enp2s0
  ipAddress: 172.16.3.129
  ipAddresses:
    - 172.16.3.129
    - fe80::c0:81ff:fe4c:2f04
  linkState: up
  mac: 02:c0:81:4c:2f:04
  name: nic-white-chimpanzee-56
  podInterfaceName: podd600d5cae69
  queueCount: 1
Of course, you can find the IP in the OpenShift Virtualization Console:

Either way, you can now directly access the instance:
➜  ~ ssh cloud-user@172.16.3.129 -identity-file=$HOME/.ssh/id_ecdsa_okd
Warning: Identity file dentity-file=/Users/rilindo/.ssh/id_ecdsa_okd not accessible: No such file or directory.
The authenticity of host '172.16.3.129 (172.16.3.129)' can't be established.
ED25519 key fingerprint is SHA256:jl2m7bh/C5vHWfL9q47/DDN5GPkBdV7G9jKhHLc9fZw.
This key is not known by any other names.
Are you sure you want to continue connecting (yes/no/[fingerprint])? yes
Warning: Permanently added '172.16.3.129' (ED25519) to the list of known hosts.
[cloud-user@rocky-vm-nmstate ~]$ cat /etc/redhat-release
Rocky Linux release 10.1 (Red Quartz)
[cloud-user@rocky-vm-nmstate ~]$
And because the virtual machine is accessible, you can access the webserver via the same IP:

Along with its connect route:

Conclusion
If you are virtualiation professional, you may already been familiar with concepts here and may find this easy to pick. If you are a Kubernetes professional who never need to manage beyond containers, this is a good primer on how to get started. Feel free to reach out to me here if you have any thoughts or suggestions.